Homemade Vanilla Butter: A Simple Guide to a Delicious Sweet Spread
Imagine a spread so rich, so fragrant, and so utterly delightful that it transforms an ordinary piece of toast into a gourmet experience. This is the magic of homemade vanilla butter. While compound butters often evoke images of savory herbs and spices, a sweet vanilla-infused butter offers a surprisingly versatile and incredibly delicious alternative. Learning how to make vanilla butter from scratch is not only incredibly simple but also immensely rewarding, promising a burst of natural flavor that store-bought options simply can't match.
In under ten minutes, you can whip up this sweet spread using pre-made butter. However, for an even more profound sense of accomplishment and unparalleled freshness, you can churn your own butter from heavy cream in just a few more minutes. The process is straightforward, the ingredients are minimal, and the result is a culinary delight perfect for everything from breakfast pastries to sophisticated desserts. Get ready to elevate your kitchen game with this easy-to-follow guide.
The Allure of Homemade Vanilla Butter
There's something uniquely special about creating food from its most basic components, and making your own vanilla butter is no exception. Beyond the sheer satisfaction, the benefits are numerous. Firstly, you gain complete control over the quality of ingredients, ensuring no artificial flavors or preservatives taint your spread. Secondly, the flavor of freshly made vanilla butter is simply unparalleled – bright, aromatic, and deeply satisfying, especially when you use a real vanilla bean.
But what do you do with this golden, speckled goodness? The possibilities are surprisingly vast! It's an obvious choice for slathering on warm toast, fluffy pancakes, or freshly baked muffins, instantly elevating your breakfast or brunch. Beyond that, consider melting it over roasted sweet potatoes or acorn squash for a savory-sweet side dish. It can be folded into sweet baking recipes, enriching cakes and cookies, or even whipped into a unique buttercream frosting. Whether you're enhancing a simple snack or adding a gourmet touch to a special meal, homemade vanilla butter is a true kitchen hero.
Essential Ingredients for Your Vanilla Butter Masterpiece
One of the most appealing aspects of learning how to make vanilla butter is the minimal ingredient list. For the purest form, you only need two main components, with optional additions to tailor it to your exact preferences.
- Heavy Cream (or Double Cream): This is the foundation of your butter. For the best results, opt for fresh, high-quality heavy cream or double cream with a fat content of at least 36%. The higher the fat content, the quicker and more efficiently your cream will transform into butter. Ensure it's cold when you start; this aids in the churning process.
- Vanilla Pod (or Natural Vanilla Extract): This is where the magic happens!
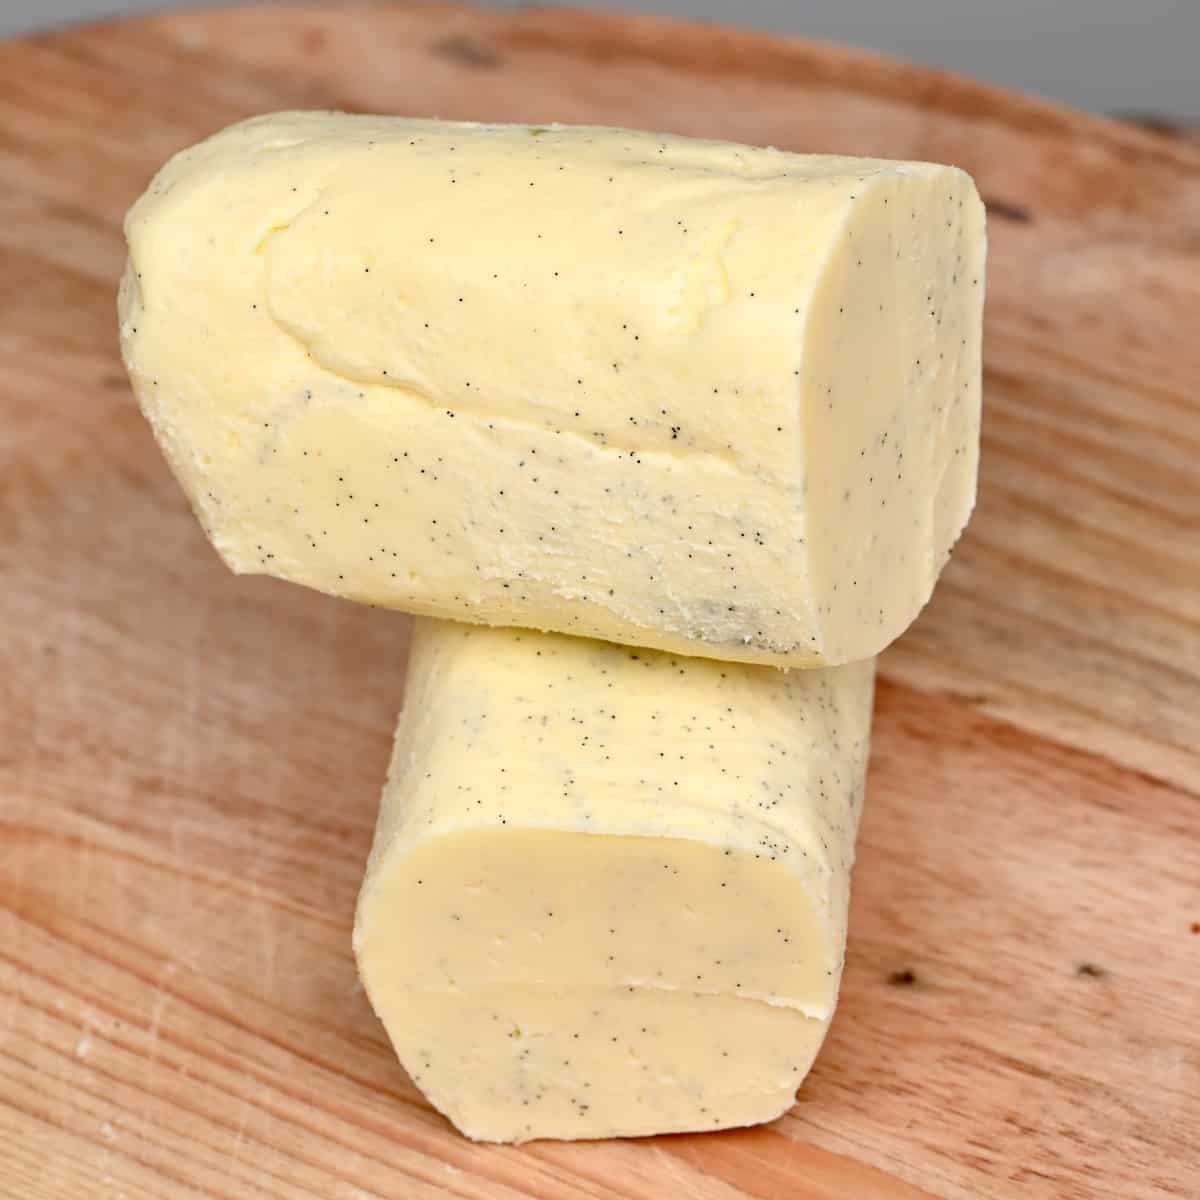
- Vanilla Pod: For a truly gourmet experience and those beautiful visible vanilla flecks (often called vanilla caviar), a fresh vanilla pod is ideal. To use it, simply split the pod lengthwise with a sharp knife and scrape out the tiny, fragrant seeds. These seeds will infuse your butter with an intense, natural vanilla aroma and flavor.
- Natural Vanilla Extract: If vanilla pods are unavailable or you want to boost the flavor even further, a good quality natural vanilla extract is an excellent addition. Avoid artificial vanilla essence, as it won't deliver the same depth or authenticity.
Optional Enhancements for Depth and Sweetness:
- A Pinch of Salt: Just a tiny amount of salt can profoundly impact the overall flavor profile. It acts as a flavor enhancer, balancing the sweetness and bringing out the complex notes of the vanilla. We recommend using a fine sea salt.
- Powdered Sugar (or Sweetener of Choice): If you desire a distinctly sweet butter, powdered sugar (also known as confectioners' sugar) is the ideal choice due to its fine texture, which ensures a smooth, lump-free consistency. Start with about 1 tablespoon and adjust to taste. You can also experiment with other granulated sweeteners like coconut sugar, cane sugar, or erythritol, but we recommend grinding them into a fine powder first to achieve that desirable smooth texture.
Step-by-Step Guide: How to Make Vanilla Butter from Scratch
The journey from liquid cream to solid, luscious butter is a fascinating one, and surprisingly simple to achieve at home. Here’s a detailed guide on how to make vanilla butter.
Gather Your Tools
You'll need a mixing device to agitate the cream. Your options include:
- Stand Mixer: With a whisk attachment, this is the most efficient and least labor-intensive method.
- Hand-Held Mixer: Great for smaller batches and provides good control. Use a large, deep bowl to prevent splatters.
- Whisk: If you're feeling adventurous and have a lot of muscle and patience, a good old-fashioned whisk can get the job done, but be prepared for a workout!
The Transformation: From Cream to Butter
- Start Mixing: Pour your cold heavy cream into the bowl of your stand mixer, or into a large glass jar if using a hand-held mixer. Begin mixing on medium-high speed.
- Watch the Stages: The cream will go through several distinct phases:
- Whipped Cream: Initially, it will become soft peaks, then stiff peaks, transforming into beautiful whipped cream. Don't stop here!
- Stiffer Cream: Continue mixing. The whipped cream will start to look grainier and stiffer, losing some of its smooth appeal.
- Separation: Suddenly, the mixture will "break." You'll notice solid yellow butterfat solids separating from a milky liquid. This liquid is buttermilk! This is the magical moment your butter is born. Reduce the speed as it separates to minimize splashing.
Draining the Buttermilk
Once the butter and buttermilk have clearly separated, it's crucial to drain the buttermilk thoroughly. This step is vital for the butter's shelf life and flavor.
- Strain: Pour the contents of your mixing bowl through a fine-mesh sieve or colander lined with cheesecloth, capturing the buttermilk in a separate bowl.
- Squeeze: Gather the butter solids together and gently squeeze out as much residual buttermilk as possible. You'll be surprised how much liquid remains. Don't discard the buttermilk; it's fantastic for baking (think pancakes, biscuits, or even fried chicken marinades) and can be stored in the fridge for up to a week.
Washing the Butter
This is arguably the most critical step for homemade butter, especially if you want it to last. Any remaining buttermilk in the butter will cause it to spoil quickly and develop an off-flavor.
- Cold Water Bath: Place the butter into a bowl of very cold, ideally ice-cold, water.
- Knead and Rinse: Using your hands (or a wooden spoon), knead the butter under the water. You'll see the water turn cloudy as more buttermilk is released.
- Repeat: Drain the cloudy water and refill the bowl with fresh cold water. Continue to knead and rinse the butter, changing the water, until the water remains completely clear. This indicates all the buttermilk has been washed away.
- Final Squeeze: Once washed, remove the butter from the water and give it a final, firm squeeze to remove any excess moisture.
Infusing the Vanilla and Sweeteners
Now for the delicious final touch!
- Add Flavorings: Place the clean, dry butter back into your mixing bowl. Add the scraped vanilla seeds (and/or vanilla extract), a pinch of salt, and your desired amount of powdered sugar or other sweetener.
- Mix Well: Mix on low speed until all the ingredients are thoroughly incorporated and evenly distributed throughout the butter. The butter should be smooth and creamy, with visible vanilla specks.
- Taste and Adjust: Take a small taste and adjust the sweetness or saltiness as needed. You can always add more, but you can't take it away!
Congratulations, you've successfully learned how to make vanilla butter from scratch!
Creative Flavor Variations to Elevate Your Vanilla Butter
Once you've mastered the basic recipe, the fun truly begins with experimenting. Here are a few popular and delightful variations to inspire your culinary creativity:
- Vanilla Honey Butter: A classic for a reason! Whipped honey butter is already beloved, and the addition of vanilla elevates it to new heights. Incorporate honey into your vanilla butter, starting with about 1 tablespoon and adding more gradually until you reach your desired level of sweetness and honey flavor. This is particularly good with warm biscuits.
- Citrus Vanilla Butter: For a bright, zesty twist, experiment with citrus zest. Lemon, orange, or lime zest (or a combination) pairs beautifully with vanilla. Add between 1-2 teaspoons of finely grated zest into your butter for a vibrant aroma and a subtle tang that cuts through the richness.
- Spiced Vanilla Butter: Add warmth and complexity with spices.
- Cinnamon Vanilla Butter: A dash of ground cinnamon (around ½ to ¾ teaspoon) can transform your plain vanilla butter into a cozy spread, especially perfect for autumn and winter treats. It's also delicious when combined with honey.
- Vanilla Chai Butter: For an exotic twist, incorporate a ground chai spice blend (also around ½ to ¾ teaspoon). This is fantastic when combined with powdered sugar or honey, offering notes of cardamom, ginger, cloves, and cinnamon alongside the vanilla.
Don't be afraid to think outside the box! A pinch of nutmeg, a hint of cardamom, or even a touch of maple syrup could create your next favorite custom spread. For more exciting ideas and detailed twists, check out our guide on Mastering Vanilla Butter: Easy Recipe & Creative Flavor Twists.
Storage and Shelf Life
Properly washed homemade vanilla butter, stored in an airtight container, will last for about 1-2 weeks in the refrigerator. For longer storage, you can freeze it for up to 3-6 months. Portioning it into smaller amounts before freezing can be very convenient, allowing you to thaw just what you need.
Conclusion
Learning how to make vanilla butter is an incredibly simple yet profoundly rewarding kitchen skill. From just heavy cream and a vanilla pod, you can create a luxurious, fragrant spread that elevates everything it touches. Whether slathered on morning toast, melted over roasted vegetables, or incorporated into your favorite baked goods, homemade vanilla butter offers a depth of flavor and freshness that is truly unmatched. So, grab your cream and vanilla, and embark on this delicious journey – your taste buds will thank you!
